Wednesday, July 17, 2024

DIY Pom-Pom Garland


I am so excited to be able to share this tutorial with you! I have wanted to create a pom-pom ceiling drape for a few years now, but pom-pom garlands are EXPENSIVE and short. For a 6.5-foot garland, it's $12.99 MINIMUM!!!

NO THANK YOU!

I would spend $75, OR MORE, to have the amount needed for my classroom ceiling drape. So I was done with that idea.....

Until I lucked up one Wednesday in June.... Do any of you enjoy those bargain bin places? I call them digging stores. It's all returned and lost items from different companies, and these stores buy the items by the pallet, without knowing what is in them. Sometimes the stores are awesome, and sometimes it's a major bust. This specific day was AWESOME!!!!

I found huge PACKS of pom-poms for FIFTY CENTS!!!!!!!

1. My first task was sorting them by color to see what I was working with. Shout out to my 7-year-old for helping me sort!


2. From there I came up with a pattern for my garlands.


3. Next, I got my yarn and yarn needle and got to work.


4. Once the floors were waxed, I could get into my classroom and hang these beauties up! I'm sooooooooooo happy with how well they turned out! They look amazing!


Thanks for stopping by! I hope you enjoyed it!


Saturday, January 6, 2024

Kielbasa Pasta Primavera


INGREDIENTS


        • 7 oz (1/2 box) penne
        • Kielbasa (sliced)
        • 5 oz (1/2 bag) of fresh spinach
        • 5 cheese Italian shredded cheese
        • Alfredo Sauce (I use creamy basil)
        • 1 medium Red Onion (diced)
        • 8 oz of fresh SLICED Mushrooms
        • 6 cocktail tomatoes (sliced)
        • 15 oz 1% milk
**If you want to make this meal as healthy as possible,
I recommend using TURKEY kielbasa and PROTEIN penne.

DIRECTIONS


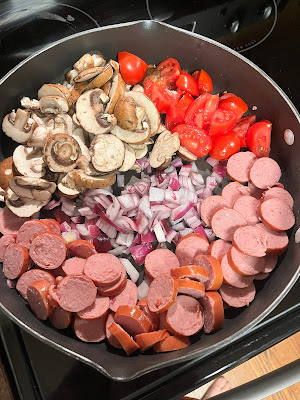
Add your kielbasa, spinach, onion, tomatoes, and mushrooms to a LARGE skillet and cook on medium for 20 minutes. While your skillet mixture is cooking, pour the penne into a pot filled with water and cook as directed on the box.


I always giggle at how FULL a skillet looks when you first pour in spinach....


And then it shrinks up to basically nothing.... This is when I start to giggle.


Back to the directions.....
Drain the water from your pot of penne and add penne to the skillet mixture. Stir to combine. Add the shredded cheese, milk, and Alfredo sauce to the skillet mixture. Stir to combine.

MAKE LIFE EASIER TIP:
I gave you the exact amount of milk to use, but save yourself extra dishes!! Just fill the Alfredo jar up with milk and pour the milk into the skillet mixture.
Why did I just tell you to fill the Alfredo jar up with milk? Look at your Alfredo jar: There is still Alfredo in the jar that wouldn't come out when you poured, right? Now pour milk into the jar, put the lid on the jar, give it a good shake, and pour the milk into the skillet....all of the Alfredo sauce has now been put in the skillet, plus the milk needed.
I call that a win-win.

Cook on medium heat for about 15 minutes. Stir occasionally. This will give the sauce and milk time to really soak into the penne and mixture to give that perfect flavor.


Leave a comment below and tell me how it turned out!

I served this dish with a Caesar Salad and breadsticks.

I hope you enjoy this recipe! I have provided a printable recipe card for you below. Simply click on the photo to print the recipe. Thanks for stopping by! Be sure and follow me on Pinterest!


↓ CLICK IMAGE BELOW TO PRINT ↓


Sunday, December 6, 2020

Stool Makeover!


Y’all! I am BEYOND stoked over my stool makeover! So my cousin-in-law was sweet enough to give me an old stool she wanted out of her way. I saw a pin on Pinterest….of course, I did….where someone took an old stool and updated it to look like pencils, crayons, and paper. I immediately thought to myself, I AM TOTALLY DOING THIS FOR MY CLASSROOM!!!! I am so pleased with how it turned out!

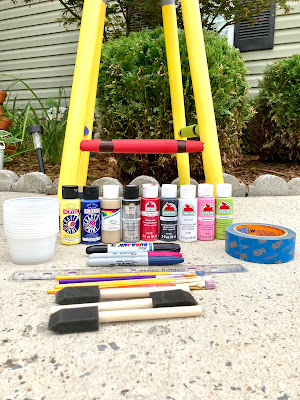
If you would like to create your own all you’ll need is……

An old stool
Lots of paint varieties
Painters tape
Sharpies
Ruler
A variety of paintbrushes
LOTS AND LOTS AND LOTS OF TIME!!!!!

The most time-consuming part of this craft is waiting for each color to dry, before beginning another color. I also recommend using Mod Podge on your stool. I feel it will seal it off better.


SO WHAT DO YOU THINK?!?!?!?! Leave me a comment below!


FREE Santa Claus Cutting Practice Activity


We all love our tiny people! And helping them with gross motor skills is a must, even when we cringe at the thought of handing our 3 or 4 year old with a pair of scissors.

So, to create this adorable activity, all you need is:

  • Santa Claus Template (bottom of page)
  • Scissors
  • Glue Sticks
  • Cotton Balls
First start by cutting out all of your pieces. Each template will create TWO complete Santas.

Next, have your child/student cut along the dotted line on the beard portion of the Santa.

TIP: To incorporate shapes into the craft, ask your child/student to hold up the square. The square will be the beard portion of the Santa.

Next, glue all the Santa pieces together to form your Santa Claus.

Next, decorate your Santa’s face! Maybe draw eyes or glue googly eyes down. Draw a nose or some rosy cheeks. BE CREATIVE!!!

Finally, hang and give lots and lots of praise for how amazing your child/student did on their Santa!


This craft was created FREE for you by Another Rawrsome Blog. You may NOT alter this template for any reason. You may NOT sell this template for your own personal gain.

DOWNLOAD TEMPLATE BY CLICKING HERE


Friday, June 26, 2020

Organizing Essential Oils


I do not know about you…..but I was soooooooo tired of seeing this….

It was like no matter how hard I tried to keep them organized, I simply could never just open the drawer, grab the bottle I want, and go. I had to spend minutes searching for the ONE bottle I wanted, while my toddler was at my legging pulling at me. Sigh.

I have a weird obsession with office supplies. I LOVE office supplies! So I had a packet of blue, 1″, circle labels laying around and decided to do a little experiment.

THESE ARE FANTASTIC, Y’ALL!!!!!

So simple!!! I seriously LOVE going to my drawer and just grabbing the bottle I wanted and going. You should totally give this a try!!! 


Thursday, June 18, 2020

From Trash to Halloween Decor


So I found these two beauties for $1 at a yard sale, and free in my mom’s basement. So I decided to make them cute Halloween decor!

Spray paint the base –> Stick in 3 candles –>
Add a few bat stickers –> And Done!


Wednesday, June 17, 2020

Make Your Own "Lunchable" Lunch


I don’t know about you, but I’m tired of paying $3.00 for ONE Lunchable, and it’s not even remotely enough food for my 9-year-old! So I have been trying a few ideas….

This is her favorite so far!

All you need is:

Food

Grapes
Naan Bread
Pizza Sauce
Mozzarella Cheese
Mini Pepperonis
Drink of choice

Containers

Reusable divided container
Throw-away condiment cups with lids
Baking cups (reusable or throw-away)


You can change this up in so many different ways!!!!

IDEAS
  • Nachos & cheese, fresh fruit or veggies
  • Ham, cheese, crackers, fresh fruit or veggies
  • Turkey, cheese, and crackers, fresh fruit or veggies
  • Carrots, broccoli, ranch dressing – for the veggie lovers!
  • Vanilla yogurt, granola, fresh fruit
  • Sweet Hawaiian Rolls, ham slices, swiss cheese slices, fresh fruit or veggies


Tuesday, June 16, 2020

Cheesy Chicken & Rice Burritos


This recipe has a funny story behind it. Our new home is only 2 miles from my best friend, and 5 miles from my baby sister. Needless to say, we spend a lot of time together. So one night my sister and I were trying to come up with something to make for dinner. Neither of us felt like going to the grocery store. So we decided to compare our cabinets and come up with a meal with what we had.

Thus, Cheese Chicken & Rice Burritos were born!

(say this with the PowerPuff Girls theme in your head)

INGREDIENTS
  • 1 pound boneless skinless chicken breast or strips
  • 5 minute rice
  • Tortilla wraps
  • 1 cup Shredded cheese (we used a variety of what we had, haha)
  • 1 can Rotel
  • Queso
  • 1/2 cup hot sauce
  • 1/2 cup ranch dressing
DIRECTIONS

Preheat oven to 375 degrees. Boil, then shred, your chicken. Prepare your rice as directed on the box. In a bowl, mix together the shredded chicken, rice, hot sauce, ranch dressing, shredded cheese, and 1/2 of the Rotel. Divide the mixture among the wraps, and wrap them up! Bake for 15 minutes. Carefully remove from oven, drizzle queso all over the top, then add remaining queso on top. Place back in the oven for 5 minutes. Remove and enjoy!


PRINT THIS RECIPE BY CLICKING HERE