Showing posts with label diy. Show all posts

Wednesday, July 17, 2024

DIY Pom-Pom Garland


I am so excited to be able to share this tutorial with you! I have wanted to create a pom-pom ceiling drape for a few years now, but pom-pom garlands are EXPENSIVE and short. For a 6.5-foot garland, it's $12.99 MINIMUM!!!

NO THANK YOU!

I would spend $75, OR MORE, to have the amount needed for my classroom ceiling drape. So I was done with that idea.....

Until I lucked up one Wednesday in June.... Do any of you enjoy those bargain bin places? I call them digging stores. It's all returned and lost items from different companies, and these stores buy the items by the pallet, without knowing what is in them. Sometimes the stores are awesome, and sometimes it's a major bust. This specific day was AWESOME!!!!

I found huge PACKS of pom-poms for FIFTY CENTS!!!!!!!

1. My first task was sorting them by color to see what I was working with. Shout out to my 7-year-old for helping me sort!


2. From there I came up with a pattern for my garlands.


3. Next, I got my yarn and yarn needle and got to work.


4. Once the floors were waxed, I could get into my classroom and hang these beauties up! I'm sooooooooooo happy with how well they turned out! They look amazing!


Thanks for stopping by! I hope you enjoyed it!


Sunday, December 6, 2020

Stool Makeover!


Y’all! I am BEYOND stoked over my stool makeover! So my cousin-in-law was sweet enough to give me an old stool she wanted out of her way. I saw a pin on Pinterest….of course, I did….where someone took an old stool and updated it to look like pencils, crayons, and paper. I immediately thought to myself, I AM TOTALLY DOING THIS FOR MY CLASSROOM!!!! I am so pleased with how it turned out!

If you would like to create your own all you’ll need is……

An old stool
Lots of paint varieties
Painters tape
Sharpies
Ruler
A variety of paintbrushes
LOTS AND LOTS AND LOTS OF TIME!!!!!

The most time-consuming part of this craft is waiting for each color to dry, before beginning another color. I also recommend using Mod Podge on your stool. I feel it will seal it off better.


SO WHAT DO YOU THINK?!?!?!?! Leave me a comment below!


Friday, June 26, 2020

Organizing Essential Oils


I do not know about you…..but I was soooooooo tired of seeing this….

It was like no matter how hard I tried to keep them organized, I simply could never just open the drawer, grab the bottle I want, and go. I had to spend minutes searching for the ONE bottle I wanted, while my toddler was at my legging pulling at me. Sigh.

I have a weird obsession with office supplies. I LOVE office supplies! So I had a packet of blue, 1″, circle labels laying around and decided to do a little experiment.

THESE ARE FANTASTIC, Y’ALL!!!!!

So simple!!! I seriously LOVE going to my drawer and just grabbing the bottle I wanted and going. You should totally give this a try!!! 


Thursday, June 18, 2020

From Trash to Halloween Decor


So I found these two beauties for $1 at a yard sale, and free in my mom’s basement. So I decided to make them cute Halloween decor!

Spray paint the base –> Stick in 3 candles –>
Add a few bat stickers –> And Done!


Wednesday, June 17, 2020

Make Your Own "Lunchable" Lunch


I don’t know about you, but I’m tired of paying $3.00 for ONE Lunchable, and it’s not even remotely enough food for my 9-year-old! So I have been trying a few ideas….

This is her favorite so far!

All you need is:

Food

Grapes
Naan Bread
Pizza Sauce
Mozzarella Cheese
Mini Pepperonis
Drink of choice

Containers

Reusable divided container
Throw-away condiment cups with lids
Baking cups (reusable or throw-away)


You can change this up in so many different ways!!!!

IDEAS
  • Nachos & cheese, fresh fruit or veggies
  • Ham, cheese, crackers, fresh fruit or veggies
  • Turkey, cheese, and crackers, fresh fruit or veggies
  • Carrots, broccoli, ranch dressing – for the veggie lovers!
  • Vanilla yogurt, granola, fresh fruit
  • Sweet Hawaiian Rolls, ham slices, swiss cheese slices, fresh fruit or veggies


Wednesday, May 20, 2020

Summer Fun Tips!


Keep those man-sized mosquitoes away by using PIPE STRAPS to hold your tiki torches in place!

Pipe straps come in all sizes and are crazy cheap! The pipe straps I bought only cost 40 CENTS each!!!!


Enjoy a SUPER-SIZED round of everyone’s favorite game using only a few items!


To make this SUPER SIZED “Twister” mat you will need:
  • Four colors of spray paint (we used turquoise, red, yellow, and lime)
  • Cardboard with a circle cut out of it
  • Canvas drop cloth (painters use these)

Use the cardboard circle cut out as your template to spray paint circles on your mat. BE CREATIVE!!!! Spray paint your mat however you wish!

WHAT ABOUT THE SPINNER? We used our Twister spinner in our traditional game for our super-sized game mat.


Saturday, May 9, 2020

Hidden Tiki Torch Stand

 Hidden Tiki Torch Stand

SO YOU KNOW HOW WHEN YOU BUY TIKI TORCHES YOU STICK THEM IN THE GROUND AND THEN AFTER A WHILE THEY ROT FROM THE RAIN AND WEATHER? I DID NOT WANT TO SPEND $20+ FOR ONE METAL TIKI TORCH BUT AT THE SAME TIME DID NOT WANT TO BUY A BAMBOO TIKI TORCH JUST TO HAVE TO PURCHASE MORE NEXT YEAR.

WE CAME UP WITH A VERY LOW COST SOLUTION!!!


SUPPLIES

  • TIKI TORCH
  • PVC PIPE (A LITTLE LARGER THAN THE BOTTOM OF YOUR TIKI TORCH)
  • HAMMER

DIRECTIONS

STEP 1
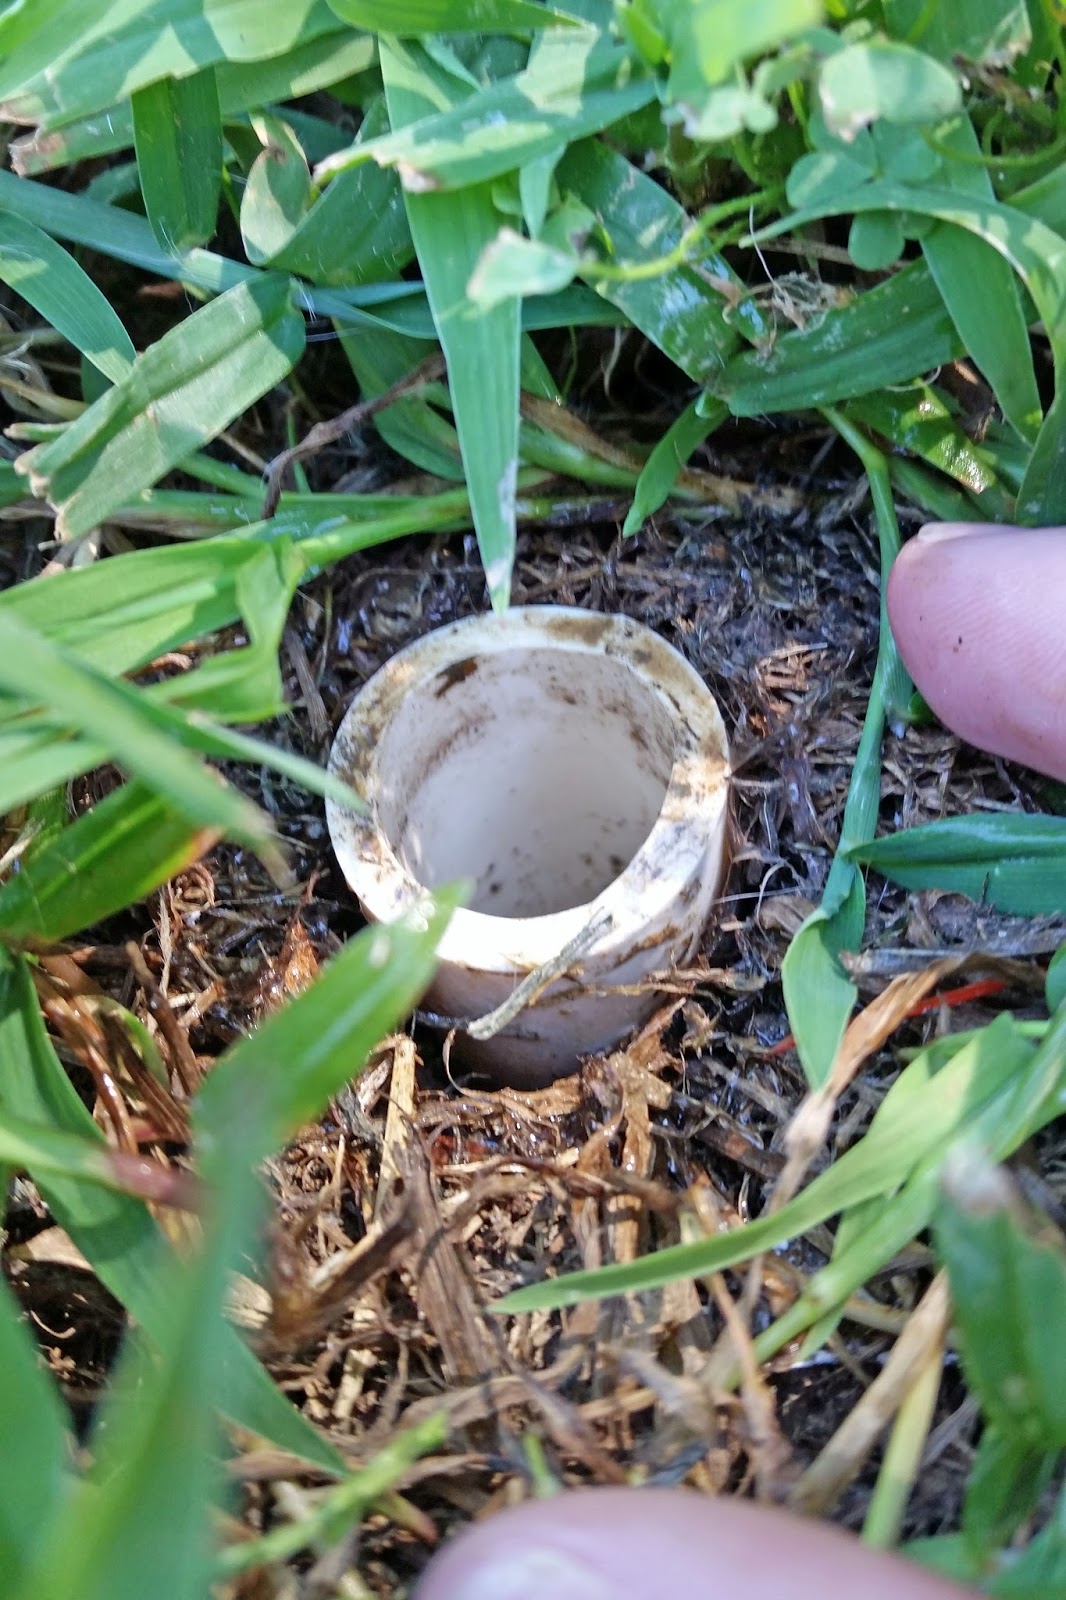
CUT 7" PIECES OF PVC PIPE

STEP 2
​HAMMER PVC INTO THE GROUND

STEP 3
​INSERT TIKI TORCHES

STEP 4
​ENJOY!

YES, THAT IS IT! SUPER SIMPLE AND SUPER LOW COST! WE HAD EXTRA PVC PIPE IN OUR SHED SO THIS ONLY COST US THE PRICE OF THE TIKI TORCHES. I TOTALLY LUCKED UP AND GOT THE TIKI TORCHES 75% OFF AT TARGET. WHEN YOU ARE FINISHED WITH YOUR TIKI TORCHES FOR THE DAY, SIMPLY TAKE OUT OF YOUR NEW STAND AND STORE YOUR TIKI TORCHES AWAY. YOUR NEW HOLDER STAYS OUT OF SITE AND IN THE GROUND FOR YOUR NEXT TIKI TORCH USE.


DIY Lamp Post


SUPPLIES

4X4X36 (WOOD)
1X6X6 (WOOD) X2
1X8X8 (WOOD) X2
HOOK (OPTIONAL)
SOLAR POWERED LIGHT


TOOLS NEEDED

DRILL & BITS
MEASURING TAPE
PENCIL
3″ WOOD SCREW X2


DIRECTIONS

** I SUGGEST PAINTING YOUR WOOD PIECES BEFORE BEGINNING YOUR PROJECT. THIS WILL SAVE YOU FROM A MAJOR HEADACHE LATER.


STEP 1: MARK THE CENTER OF EACH WOOD PIECE.


STEP 2: DRILL A HOLE IN EACH WOOD PIECE


STEP 3 – NOW LET’S PUT IT TOGETHER! TAKE A 1X8X8 AND A 1X6X6 AND SCREW TO THE BOTTOM OF YOUR POST USING A 3″ WOOD SCREW. THEN, TAKE THE OTHER 1X8X8 AND 1X6X6 AND SCREW TO THE TOP OF YOUR POST WITH A 3″ WOOD SCREW.


STEP 4 – NOW SIMPLY ATTACH YOUR SOLAR LIGHT AND HOOK AS INSTRUCTED BY DIRECTIONS ON THE HOOK AND SOLAR LIGHT YOU WENT WITH. AND DONE!


Thursday, May 7, 2020

Teacher Appreciation Week Gift Idea


Most of us have more than one child….and when you have children in daycare you are bound to have at least four teachers to buy gifts for. So say you have two in daycare: that’s EIGHT gifts. Say you also have a child in elementary who is in an inclusion class…that’s another two. You see my point as how this can add up super quick!

To add on this cost….I am a total gift stressor! I want to buy gifts that teachers will actually use…without breaking the bank….

I decided to go with a coconut theme. I went to the Dollar Tree and bought a travel size Palmer’s Coconut Lotion, Palmer’s Coconut Lip Balm, and Mini Anastasia Coconut Patties, loot bags, and some gold gift shred (that streamer looking stuff).
So all I did was place one lotion, one lip balm, and two mini coconut patties in each bag with a little gold shred in the bottom. That was it! Tie it closed with ribbon or the twist ties provided in the loot bags. I had my kiddos write a cute note on each of theirs.
UNDER TWENTY DOLLARS TO CREATE 7 GIFT BAGS!!!